 |
| My Style |
Hi guys how are you today?? I hope you all fine.
Ok today i'll tell you about how to design a simple text with inkscape, waw this is my first tutorial so i hope you can enjoy it and understand it.
This is an simple design that you can do without any problem. In this tutorial i'll explain it step by step so that you'll be understand it easily.
Ok lets start it.
Step 0
Before we start it we have to open the application in this case is Inkscape in this case i use Ubuntu GNU Linux.
Applications > Graphics > Inkscape Vector Graphics Editor
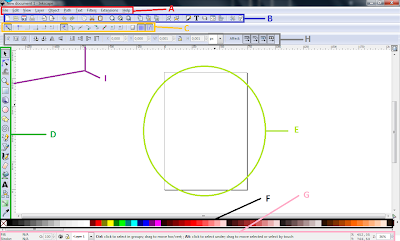
After we click it it'll appear the worksheet wich it'll be like this.
information :
- A = Menu Bar
- B = Command Bar
- C = Snap Control Bar
- D = Tool Box
- E = Lembar Kerja
- F = Palette
- G = Status Bar
- H = Tool Control Bar
- I = Rulers
Step 1
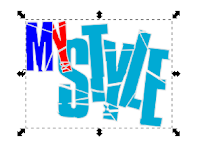
Now we make the text for the start, use the create and edit text object tool in tool box and then make a text like this bellow and then change the Font Style into a Bison Font Style and set the size for "MY" into 68px and 100px for "STYLE" and it's look like this.
After that we change the colour just like this.
Step 2
In this step we gonna make the text become like this.
To do this, first we have to select/block the letter, in this example is "M". After that we can press ALT+Left and ALT+Right to move the letters to left and right, ALT+Up and ALT+Down to move the letters to up and down or we can press Shift+ALT+Left, Shift+ALT+Right, Shift+ALT+Up, and Shift+ALT+Down.
We can rotate the letter by pressing button ALT+[ and ALT+] for counter and clockwise rotation.
Step 3
After that this time for us to make the offside part just like this.
To do that first we click the text and then click :
Path > Linked Offset or you can press CTRL+ALT+J
Can you see the node after we do that? it is right here
Ok now click and hold it, after that drag it to become like this
And then we set fill and set stroke into blue n and green like this.
Step 3 is done, now lets move to the next step.
Step 4
In this step we gonna change the size of the stroke of linked offside part and blur the linked offset part. First select the linked offside part that we make before and then you can press Shift+CTRL+F or you can click this icon in Command Bar.
After that click the Stroke Style tab and change the width become 5px, and then set the Blur bar into 5.7 it's gonna be like this:
That's for the step 4 now go to the next step, the final step, step 5
Step 5 Final Step
Ok done..... That's it, we only need 6 step to make it, from Step 0 until Step 5. It's simple right, we don't have to be pro to do this.


2 comments:
bro,,,
pake linux sekarang?
eh aku bole minta skrip buat icon2 di komen ini gak?
@rezKY pRAtama: udah lama bro aku yang makek linux... :)
boleh boleh...... ntar aku post aja yach. :)
Post a Comment