Showing posts with label Inkscape. Show all posts


Create Skype Icon in Inkscape

Skype is software that enables the world's conversations. Millions of individuals and businesses use Skype to make free video and voice calls, send instant messages and share files with other Skype users. Everyday, people also use Skype to make low-cost calls to landlines and mobiles.[1]

But today, we will not gonna talk about how to use the Skype or how to download it and install it. Today, I'll will tell you how to make a Skype icon. Ok here we go.....

Step 1
First we open the Inkscape and then we make 3 circle like this bellow using tool "Create circles, ellipses, and arcs"
After we create the circles, now we set it into one line like this.
To make it like that you can do like this : First we set the two circles in above and in bottom become like this.
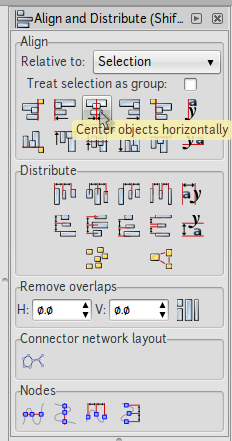
After that we click this icon on "the command bar" area.
Then it will show "Align and Distribute" page on right side. Now click "the center objecs horizontally" icon to make it centered in one line.
When it done, union it by pressing Ctrl + + and change the color into light blue (#00CCFF) like this.
Step 2
In this step 2 we gonna make the light shadow one like this.
First we gonna make an offset from the circle that we have make before by doing this. Click the circle and then go to "Path > Linked Offset" or we can use the short cut by perssing Alt + Ctrl + J.
Then zoom it, click the node and drag it "in" not "out".
After that now we set the color into "White" and press "Page Up" Button to make it in front of the body like this.
Then block it all and rotate it like this.
Now we gonna make the gradient from the white one, by doing this : select the white part and then click "create and edit gradients" tool on the tool box side.
And make it like this bellow.
That's for the Step 2.
Step 3
This is the final Step, in this Step we gonna make the letter "S" by doing first click the "Create and edit text object" tool in Tool Box.
And write the "S" like this bellow.
After that we change the "S" style by clicking "View and select Font Family, ..." tool in Command Bar.
And it'll show like this. I use Bold Courier Font Style in here.
Now set all of it like the image above, click "apply" button and close it. And then set the position into the middle of body and chage the color into white, it gonna be like this.
That was the last step, after that we can export it into png format. You can click in here if you don't know how to format it into png file.
READ MORE - Create Skype Icon in Inkscape


SVG to PNG

Hi guys, how are you today? :) how's your work? is it fine???
Today i'm gonna tell you how to export the svg file into the Bitmap file (.png) in Inkscape. Actually this is an easy part, all we need it just open the svg file with Inkscape and then select/block it all the image that had been made before to export it into Bitmap file (.png) like this.
My Banner Project
In this case I use my banner blog project. After we select / block it all, now on the Command Bar side we click "Export this document or a selection as a bitmap image" (
The Export Tool
) tool and it'll appear a windows like this.
The Export Window
Ok now on the Export Area set it become "Selection" it mean it will export the image which we have already selected before, click the browser button to change the directory that you use to save the image, and then click the Export button. This is the result.
Final Result
READ MORE - SVG to PNG


A Simple Facebook Icon

Loewyi Room (loeroo)
Facebook Icon

Hi guys, we meet again today. Today i'm gonna share to you how to make a simple facebook icon with Inkscape. I think you all know what is facebook, because in this era everybody use it. Not only young children but also adults and even kids have a facebook.

Do you know a facebook icon, right. I know there are so many icons facebook that had been made in this cyber world. You can search it on google by writing keyword "Facebook Icon" on image search tab. And..... wuzzzzzzz....... There are so many icons facebook that will be appear.

But do you ever think "Can you make it by yours own way?". Because yes i'm. That's why i'm gonna show you how to make a simple facebook icon by my own way.
Ok here we go....

Step 1
First we open the Inkscape, after that click the Create Rectangles and Squares tool on Tool Box. This is the icon of Rectangles and Squares tool :
Loewyi Room (loeroo)
Rectangles Tool
After that on Tool Control Bar set the corner of the box by set the Rx to be 40px, just like this.
Loewyi Room (loeroo)
Set The Rx
And then make the box and it's gonna just like this.
Loewyi Room (loeroo)
The Square
Step 2
Now after the box is already made, we change its color to blue like this.
Loewyi Room (loeroo)
Blue Square
Then we set the opacity of the box by pressing CTRL + SHIFT + F that will appear Fill and Stroke boxes like this.
Loewyi Room (loeroo)
Fill and Stroke
In the section marked opacity we set the opacity to be 88.9%.
Loewyi Room (loeroo)
Sey The Opacity
Step 3
After that we make the line which lies in the inside by doing this. Click on the square and then we duplicate by pressing CTRL + D, after that we set the color becomes colorless at the Palette by clicking the color that marked cross.
Loewyi Room (loeroo)
Set to Colorless
And then we set the stroke color become light blue (# D7F4EE) by right-clicking on the respective colors then click Set Stroke like this.
Loewyi Room (loeroo)
Set Stroke
After we set the stroke and then we set the thickness of a stroke in a way in Fill and Stroke boxes or we can open it by pressing Shift + CTRL + F and then we select the Stroke Style tab and we set its width to 10px.
Loewyi Room (loeroo)
Set The Width of Stroke
Step 4
After that we zoom out the square, by clicking CTRL and we pull the tip of the right of the box.
Loewyi Room (loeroo)
Zoom Out the Square
Then we set the location right in the middle position of the first square like this.
Loewyi Room (loeroo)
Set To the Center
After that we set the opacity of the second square into 59.3%
Loewyi Room (loeroo)
Set the Opacity
Step 5
And now it's time for us to make the letter "F". First click "Create and Edit Text Object" icon on the Tool Box.
Loewyi Room (loeroo)
Text Tool
After that, write the letter "f" and change the color to be white. In this Tutorial I use Calibri Font Style, but you can use another Font Style. And then we enlarge by pressing the CTRL key and then drag the bottom right corner so that it looks like this.
Loewyi Room (loeroo)
Zoom In the Text
That's for the Step 5 and now the step 6.
Step 6
In this step we gonna make the shiny part, here it is the instruction.
First we will create an oval circle, on the Tool Box click the "Create Circles, Ellipses, and Arcs" icon. Don't forget to change the color to be white.
Loewyi Room (loeroo)
Circle Tool
Then we create a circle on top to cover the top of the letter F like this.
Loewyi Room (loeroo)
Create the circle
After that we duplicate the First Square which have the blue color.
Loewyi Room (loeroo)
Duplicate the Blue Square
And then we select the Square that we have been duplicate before and the circle. First click the Square and thet press Shift+click the circle to select them both.
Loewyi Room (loeroo)
Select the Circle and the Aquare
After that, on the Menu Bar click Path > Division or we can press CTRL + / for the shortcut.
Loewyi Room (loeroo)
Make Division
And it's gonna be like this.
Loewyi Room (loeroo)
Had been Division
Then we remove the top so that would be like this.
Loewyi Room (loeroo)
After Remove the Top
Now change the opacity to be 23.0% by pressing Shift + CTRL + F and set the opacity bar so that it look like this and set the stroke color into white.
Loewyi Room (loeroo)
The Result of Step 6
Step 7 Final Touch
Duplicate the First Square, the blue one, then we change the color to be Aqua (#00FFFF) and change the opacity to be 27.9%.
Loewyi Room (loeroo)
Duplicate it
The last thing, press the PageDown (PgDn) as much as three times it used to change the position of the box at the bottom of the letter "F". So this is the final result.
Loewyi Room (loeroo)
Final Result
How about it, it's easy right. Ok, I think that's all for today and see you in another tutorial.
READ MORE - A Simple Facebook Icon


Simpel Text Style With Inkscape

Loewyi Room (loeroo)
My Style


Hi guys how are you today?? I hope you all fine.
Ok today i'll tell you about how to design a simple text with inkscape, waw this is my first tutorial so i hope you can enjoy it and understand it.

This is an simple design that you can do without any problem. In this tutorial i'll explain it step by step so that you'll be understand it easily.

Ok lets start it.

Step 0
Before we start it we have to open the application in this case is Inkscape in this case i use Ubuntu GNU Linux.

Applications > Graphics > Inkscape Vector Graphics Editor

After we click it it'll appear the worksheet wich it'll be like this.
Loewyi Room (loeroo)

information :

  1. A = Menu Bar
  2. B = Command Bar
  3. C = Snap Control Bar
  4. D = Tool Box
  5. E = Lembar Kerja
  6. F = Palette
  7. G = Status Bar
  8. H = Tool Control Bar
  9. I = Rulers
Step 1
Now we make the text for the start, use the create and edit text object tool in tool box and then make a text like this bellow and then change the Font Style into a Bison Font Style and set the size for "MY" into 68px and 100px for "STYLE" and it's look like this.
Loewyi Room (loeroo)
After that we change the colour just like this.
Loewyi Room (loeroo)
Step 2
In this step we gonna make the text become like this.
Loewyi Room (loeroo)
To do this, first we have to select/block the letter, in this example is "M". After that we can press ALT+Left and ALT+Right to move the letters to left and right, ALT+Up and ALT+Down to move the letters to up and down or we can press Shift+ALT+Left, Shift+ALT+Right, Shift+ALT+Up, and Shift+ALT+Down.
We can rotate the letter by pressing button ALT+[ and ALT+] for counter and clockwise rotation.
Step 3
After that this time for us to make the offside part just like this.
Loewyi Room (loeroo)
To do that first we click the text and then click :

Path > Linked Offset or you can press CTRL+ALT+J

Can you see the node after we do that? it is right here
Loewyi Room (loeroo)
Ok now click and hold it, after that drag it to become like this
Loewyi Room (loeroo)
And then we set fill and set stroke into blue n and green like this.
Loewyi Room (loeroo)
Step 3 is done, now lets move to the next step.
Step 4
In this step we gonna change the size of the stroke of linked offside part and blur the linked offset part. First select the linked offside part that we make before and then you can press Shift+CTRL+F or you can click this icon in Command Bar.
Loewyi Room (loeroo)
After that click the Stroke Style tab and change the width become 5px, and then set the Blur bar into 5.7 it's gonna be like this:
Loewyi Room (loeroo)
That's for the step 4 now go to the next step, the final step, step 5
Step 5 Final Step
This is the final step in this step we just gonna change the opacity of the text become 90%, by doing this. Just like Step 4 first we click the text and then press Shift+CTRL+F after that we set the opacity become 90% and here it come the final result.
Loewyi Room (loeroo)
Final Result
Ok done..... That's it, we only need 6 step to make it, from Step 0 until Step 5. It's simple right, we don't have to be pro to do this.
READ MORE - Simpel Text Style With Inkscape